- Interactive and animating graph with zooming functionality,
- Editable label with noticing that text inside it was changed external,
- table containing those editable label (JavaFX itself or any external libraries does not contains table component).
Of course we had some hard time with JavaFX as it is really young technology, but still we loved how easily we could create effectively looking and working components. Not mentioning BIND functionality which is one of the things that JavaFX developers will fall in love from the first sight :)
But a week ago our customer decided that he needs pluginable envierment and almous every element in the system needs to be a separate plugin. In the begining I was crushed. I thought that one month of our hard work will go to trash.
"We can put our JavaFX components into swing application, I've seen examples on the internet" - said my manager. So I've started looking for it and I have found not really nice looking hack called JFXScene (http://blogs.sun.com/javafx/entry/how_to_use_javafx_in), but also in comments to that article I've found info that this hack is not working with in JavaFX 1.2. But my manager said that for sure this is possible and he will do it even so google does not know it :) And he did :) How ? It is really simple, a lot simpler then a hack described in mentioned link. In few sections I will try to explain how to put JavaFX components into swing application and then into Netbeans Platform.
1. Let's start!
First we need some JavaFX component that we will try to put into swing application. Lets create our own button
public class NiceLookingButton extends CustomNode, JFXScene{
  var color = Color.LIGHTGRAY;
  var button:Rectangle;

  override function create():Node{
    var text = Text{
      content:"Button"
      fill: Color.WHITE
      font: Font{
        size: 20
      }
    }

    button = Rectangle{
      x: 0 y: 0
      width: 100 height: 50
      arcHeight:10 arcWidth: 10
      strokeWidth: 3
      stroke: bind color
      fill: LinearGradient{
        startX: 0 endX: 0
        startY: 0 endY: 1
        stops: [
          Stop{ color: Color.WHITE offset: 0},
          Stop{ color: color offset: 0.3}
        ]
      }
      onMouseEntered: function(event){
        color = Color.LIGHTBLUE;
        setFill();
      }
      onMouseExited: function(event){
        color = Color.LIGHTGRAY;
        setFill();
      }
}
Stack{
effect: Reflection{}
content:[
button,
text
]
} }
function setFill(){
    button.fill = LinearGradient{
      startX: 0 endX: 0
      startY: 0 endY: 1
      stops: [
        Stop{ color: Color.WHITE offset: 0},
        Stop{ color: color offset: 0.3}
      ]
    }
  }

}

2. Prepare to swing.
Now, when we have really pretty :) JavaFX component we can prepare it for swinging. To do this first we need to create MIXIN class.
What is mixin? Mixin was added in JavaFX 1.2 and it is a special type of class, it can not be constructed but other classes can implement multiple inheritance with them. In other words normal classes can extends many mixin classes.
Our mixin implements method that puts component into JavaFX Scene and in the end gets Object that extends JComponent.
public mixin class JFXScene {
  public function getScene():JComponent{
    var scene = Scene{content: this as Node};
    var swingScene = scene.impl_getPeer() as SwingScene;
    return swingScene.scenePanel;
  }
}
Now we can change implementation of NiceLookingButton:
public class NiceLookingButton extends CustomNode, JFXScene {
  //no changes here
}
The last thing we have to do is to add JavaFX 1.2 run time library ( which can be download from here : http://dl.javafx.com/javafx-rt-windows-i586__V1.2.0_b233.jar ) to our project class path.
Is it all? YES! it is THAT simple! we are now ready to put JavaFX component into normal Swing application!
3. Lets SWING!
Now we can create Simple Swing application, and put on its classpath javafx-rt downloaded in previous section and jar file with our JavaFX Component.
public class MainFrame extends javax.swing.JFrame {
  public MainFrame() {
    initComponents();
  }

  private void initComponents() {
    setDefaultCloseOperation(javax.swing.WindowConstants.EXIT_ON_CLOSE);
    getContentPane().setLayout(new FlowLayout());
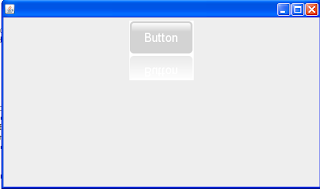
    getContentPane().add(new NiceLookingButton().getScene());
    pack();
  }

  public static void main(String args[]) {
    java.awt.EventQueue.invokeLater(new Runnable() {

      public void run() {
        new MainFrame().setVisible(true);
      }
    });
  }
}
As you can see in the code we do not use any hack or reflection to create our button, we just use normal no-argument constructor like we would create every other Java class. Isn't this nice?
 Since in swing application we have references to NiceLookingButton we can invoke any public methods like on any other java object.
3. "New construction options"
If you have worked with JavaFX before you probably know that in JavaFX Scirpt you do not declare any constructors, you create object in very nice "groovy-like" way:
MyJavaFXObject{firstName: "Michal", surename: "Margiel" }
As you can see it is really nice, but it determines that in classes compiled from JavaFX Script ces we have only default, no-argument constructor. But what if we would like to pass some information during object construction? Well... No problem ! we just need to introduce static factory method.Since there is no static key word in JavaFX all static members are declared like any other but outside class.
So if we would like to pass i.e. width and height of the button we need to introduce those properties as public variables and introduce this method:
public function create(width:Integer, height:Integer):NiceLookingButton{
  NiceLookingButton{width: width, height: height}
}

public class NiceLookingButton extends CustomNode, JFXScene{
  (...)
}
Now we just need to rebuild our library and from now on we can invoke our factory method.
private void initComponents() {
  setDefaultCloseOperation(javax.swing.WindowConstants.EXIT_ON_CLOSE);
  getContentPane().setLayout(new FlowLayout());
  NiceLookingButton button = NiceLookingButton.create(200, 100);
  getContentPane().add(button.getScene());
  pack();
}

4. Push the Button
Ok, So we can construct JavaFX objects with parameters and put them into Swing applications, also we know that we can invoke all public methods on them. But our component is a Button so it should be able react on clicking on it on swing side. Can we do it? Again - YES!
We need to introduce public variable with type function() inside NiceLookingButton
public class NiceLookingButton extends CustomNode, JFXScene{
  public var width:Integer = 100;
  public var height:Integer = 50;
  public var onMouseClick:function();
  (...)
}
and then invoke it when user click on our button (Rectangle)
onMouseClicked: function(event){
  onMouseClick();
}
after rebuilding library we have access to $onMouseClick property which accepts Function0
public Void invoke()
which will be invoke when user will click our button. Lets introduce simple implementation:
button.$onMouseClick = new Function0(){
  public Void invoke() {
    System.out.println("Nice Looking JavaFX Button Clicked!");
    return null;
  }
};
As you might noticed invoke method returns Void Object so we have to return at least null;

5. JavaFX Platform?
Ok, so the question for now is: Since NetBeans Platform uses Swing, can we also use JavaFX inside it?
and the answer is of course - YES :) and it is again really, really simple!
We just have to fallow few steps:
- Wrap up jar containing NiceLookingButton and javafx-rt into Netbeans Platform Modules.
- Add javafx-rt module to yourJavaFXLibrary module.
- Create Netbeans Platform Module with Window Component and add both yourJavaFXlibrary and javafx-rt module.
- Add NiceLookingButton to your TopComponent,
- Run NetBeans Platform project, and voilà!
private void initComponents() {
  setLayout(new FlowLayout());
  NiceLookingButton button = NiceLookingButton.create(200, 100);
  button.$onMouseClick = new Function0(){
    public Void invoke() {
      System.out.println("Nice Looking JavaFX Button Clicked!");
      return null;
    }
  };
  add(button.getScene());
}
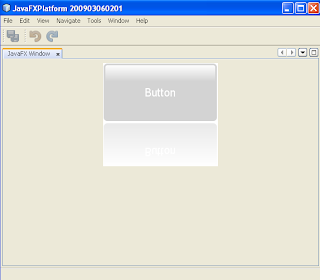
 We can see our button in Netbeans Platform, and all actions (like hovering and clicking) still works!
6. Yes, Yes, Yes!
So conclusion is really great!.
- Yes! - you can use your JavaFX 1.2 components without any reflection inside Swing applications.
- Yes! - you can invoke methods on javaFX components from swinf and oposite
- and Yes! - you can use JavaFX in Netbeans Platform to build JavaFX Platform :)
 (from left JavaFX app, Swing app with JavaFX component, and NetBeans Platform with JavaFX component)
All three NetBeans projects (JavaFX, Swing and NetBeans Platform) are available here.
In case of any questions just write to me!

